
With the temperatures rising and nearing 100°F, my son started paying more attention to the temperature. It didn’t take him long to notice that the various devices that can display the current temperature were different. Together, we found that the thermostat, my phone’s lock screen, a weather app, and a smart display in our living room were all different, with the largest difference being several degrees off. His next question was, of course:
“Dad, what IS the temperature outside?”
I set out to answer the question in the best way I know how; by making something! We need a plan and materials…
Plan
We’ll create a base station that can display the current temperature and humidity of a remote unit. Let’s have it do the following:
Base Station
- Receive weather information using wireless communication
- Display the current information on a screen
- Report the current information over serial for a computer to plot
Remote Beacon
- Take temperature and humidity readings periodically
- Send readings to a base station using wireless communication
- Run on batteries for at least a couple of days
Bill of Materials
- Arduino Nano
- Terminal Expansion
- DHT11 temperature and humidity senor
- 2x NRF24L01+ and breadboard adapter
- Arduino Uno
- LCD Screen
- Battery Pack
You can get this project kit, which includes an Arduino Uno, DHT11, LCD screen, breadboard, and wire.
Build
There are many guides online for connecting the LCD screen, the wireless radios, and the DHT11 sensor and I will share those links instead of trying to recreate their great work. Further down, you will find my code for both modules.
- Last Minute Engineers
- NRFLite – Arduino library for simple interface to NRF24L01 radios

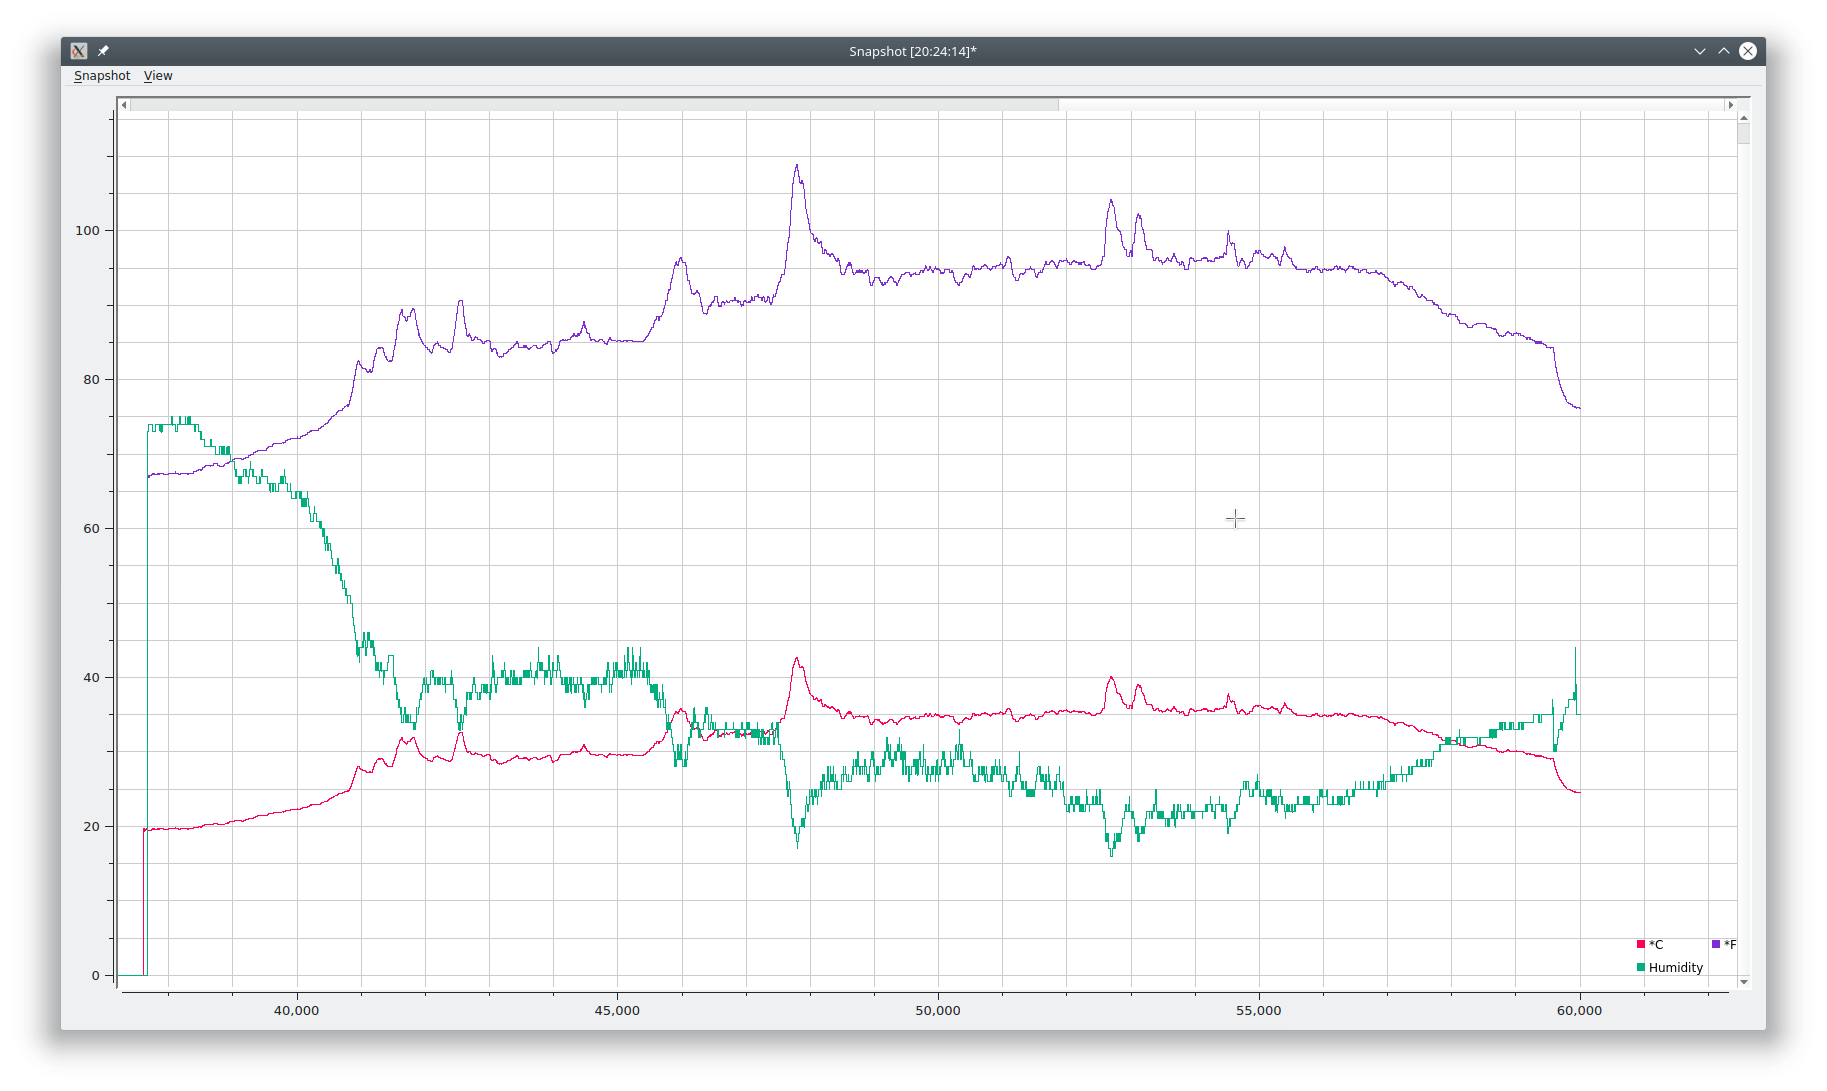
Ah, you noticed that spike from around 85°F to 106°F? And several other strange spikes? As it happens, I set the weather beacon under a tree. At different times of the day it would be in direct sunlight… There is clearly some room for improvement, but still fun to see the responsiveness of the module.
Code
#include <DHT.h>
#include <SPI.h>
#include <NRFLite.h>

const static uint8_t RADIO_ID = 1;
const static uint8_t DESTINATION_RADIO_ID = 0;
const static uint8_t PIN_RADIO_CE = 10;
const static uint8_t PIN_RADIO_CSN = 9;
const static uint8_t RADIO_CHANNEL = 95;

static const int PIN_SENSOR_DATA = 2;
static const int PIN_SENSOR_POWER = 3;
static const int PIN_SENSOR_GND = 4;

DHT dht(PIN_SENSOR_DATA, DHT11);
NRFLite radio;

struct WeatherPacket {
  float temperature;
  float humidity;
  byte id;
};

void setup() {
  Serial.begin(115200);

  // for easier wiring, I'm using a couple of I/O pins
  // to provide power and ground for the temperature sensor.
  pinMode(PIN_SENSOR_POWER, OUTPUT);
  pinMode(PIN_SENSOR_GND, OUTPUT);

  digitalWrite(PIN_SENSOR_POWER, HIGH);
  digitalWrite(PIN_SENSOR_GND, LOW);

  dht.begin();

  if (!radio.init(RADIO_ID, PIN_RADIO_CE, PIN_RADIO_CSN, NRFLite::BITRATE250KBPS, RADIO_CHANNEL)) {
      Serial.println("Cannot communicate with radio");
  }
}

void loop() {
  const float humidity = dht.readHumidity();
  const float temperature = dht.readTemperature();

  WeatherPacket packet { temperature, humidity, RADIO_ID };

  if(radio.send(DESTINATION_RADIO_ID, &packet, sizeof(packet))) {
    Serial.println("data sent");
  } else {
    Serial.println("send failed");
  }

  delay(2000);
}
#include <LiquidCrystal.h>
#include <DHT.h>
#include <SPI.h>
#include <NRFLite.h>

const static uint8_t RADIO_ID = 0;
const static uint8_t PIN_RADIO_CE = 9;
const static uint8_t PIN_RADIO_CSN = 10;
const static uint8_t RADIO_CHANNEL = 95;

static const int PIN_LCD_RS = 2;
static const int PIN_LCD_EN = 3;
static const int PIN_LCD_D4 = 4;
static const int PIN_LCD_D5 = 5;
static const int PIN_LCD_D6 = 6;
static const int PIN_LCD_D7 = 7;

static const int NUM_ROWS = 2;
static const int NUM_COLUMNS = 16;

LiquidCrystal lcd(PIN_LCD_RS, PIN_LCD_EN, PIN_LCD_D4, PIN_LCD_D5, PIN_LCD_D6, PIN_LCD_D7);
NRFLite radio;

struct WeatherPacket {
  float temperature_celsius;
  float humidity;
  byte id;
};

void setup() {
  Serial.begin(115200);

  lcd.begin(NUM_COLUMNS, NUM_ROWS);

  if (!radio.init(RADIO_ID, PIN_RADIO_CE, PIN_RADIO_CSN, NRFLite::BITRATE250KBPS, RADIO_CHANNEL)) {
      Serial.println("Cannot communicate with radio");
  }
  Serial.println("TemperatureC,TemperatureF,Humidity");
  lcd.clear();
}

void loop() {

  if(radio.hasData()) {
    WeatherPacket packet = {0.0f, 0.0f, 0};
    radio.readData(&packet);

    const float temperature_fahrenheit = (packet.temperature_celsius * 9/5) + 32;

    Serial.print(packet.temperature_celsius);
    Serial.print(",");
    Serial.print(temperature_fahrenheit);
    Serial.print(",");
    Serial.println(packet.humidity);

    lcd.setCursor(0,0);
    lcd.print(packet.temperature_celsius, 1);
    lcd.write(" C : " );
    lcd.print(temperature_fahrenheit, 1);
    lcd.write(" F" );

    lcd.setCursor(0,1);
    lcd.write("Humidity: ");
    lcd.print(static_cast<int>(packet.humidity));
    lcd.print("%");
  }
}
Results
My son and I spent a bunch of time putting the weather beacon in different locations and watching the readings settle. We did find that our weather station typically reported a temperature that seemed to be leading the other sources. So it would usually be a couple degrees warmer as the day warmed up and a little cooler as the day cooled down. Otherwise, it was fairly similar to the other sources.
Make it Better
The engineer in me is already finding a number of changes to make. Most importantly to reduce power usage and slow down the frequency of reporting. The weather beacon of course needs a box to be properly mounted. And that mess of wires between the Arduino Uno and the breadboard is unsightly. We’ll see if I get time to work on those things before the kiddo asks more questions!